Hello, I’m Kuro!
This time, I’m going to share with you how I learned to bow with ease.
This method has received a lot of feedback from various people, such as:
I wish I had known about this method earlier!


My right hand has become so much more relaxed!
Because of these comments,
I’ve decided to share part of my bowing technique—specifically, how to play with the full bow.
What is Bowing?
First, let’s talk about the basics of bowing.
Bowing refers to the act of using the bow to vibrate the strings and produce sound.
Pulling the bow from the frog to the tip is called a down-bow, and pulling it from the tip to the frog is called an up-bow.


By the way, bowing does not require force.
As the word “relaxation” implies, you should use the weight of your arm, allowing it to “hang” on the bow to produce sound.
Therefore, be cautious not to press down on the bow with force.
※ Using force can lead to tendonitis.
Key Points for Bowing:
1.Avoid putting unnecessary tension in your fingers or arm
2.Focus on vibrating the strings
3.Use the weight of your arm to play
These three points are crucial.
※ Especially the first point—it is a fundamental principle.
By mastering these three points, you’ll establish a foundation for producing sound easily and effectively.
On the other hand, no matter how advanced your technique is, if you don’t have this foundation, you won’t be able to play comfortably or with good tone.
So, let’s break down each of these three points in detail.
Why are these points important? I’ll explain thoroughly.
1. Avoid Putting Unnecessary Tension in Your Fingers or Arm
When bowing, you essentially don’t use force.
If you feel tension somewhere, it indicates an issue with your technique.
As mentioned earlier, bowing involves utilizing the weight of your arm to produce sound.


For this reason, if you forcefully extend your arm or raise your shoulder and elbow while pressing down on the bow, it can result in poor sound production or discomfort, such as pain in your right hand.
Now, let me explain how to avoid putting unnecessary tension in your arm and fingers.
1-1. Divide Bowing into Two Stages
When bowing unconsciously, most people tend to start the motion from their hand.
However, if you lead with your hand, your arm often fully extends, leaving your elbow with little room to adjust.
※ This doesn’t apply to people with unusually long arms.
When your elbow extends, your shoulder naturally lifts, causing tension.
To counter this, I recommend dividing bowing into two stages.
First, start the motion by leading with your elbow.
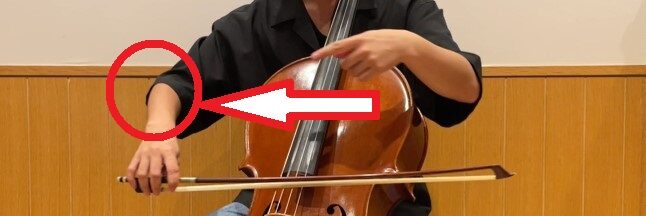

Next, extend the forearm from the elbow.
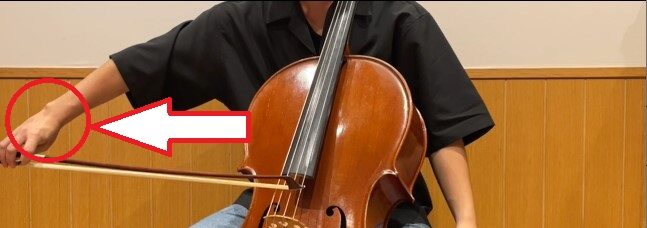

This approach allows for more flexibility in your arm.
Moreover, starting with the elbow helps you shift focus away from your hand, making it less likely to tense up.
↓
This naturally leads to relaxation.
By leading with your elbow, you also avoid inhibiting the string’s vibrations, resulting in a richer sound.
When focusing on your hand, you may unconsciously stop the string’s vibration—this is a common pitfall.
Additionally, this two-stage process makes it easier to convey the motion to beginners, especially children.
※ After 10 years of teaching, I’ve found this method to be the most effective.
At first, practice elbow-first → then forearm thoroughly.
When playing with the full bow, always prioritize leading with the elbow.
※ Make it a natural habit.
Remember: when bowing, start from the elbow.
1-2. Do Not Raise Your Elbow
Although I’ve mentioned leading with your elbow, there’s one thing to be cautious about: do not raise your elbow.
When your elbow rises, your shoulder lifts as well, causing tension.
Naturally, when using the tip of the bow, the elbow will rise slightly.
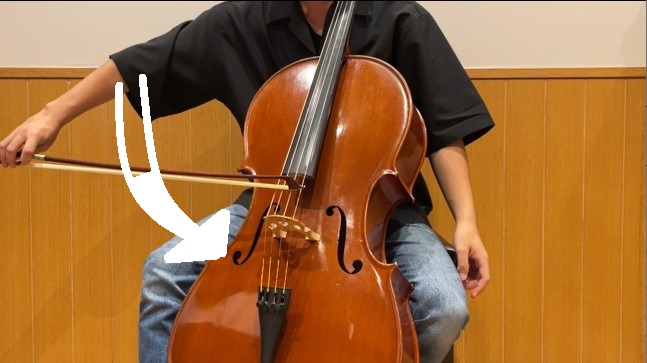

However, bring the elbow back to its original position during the up-bow.


1-3. Do Not Tense Your Thumb
Even after following 1-1 and 1-2, the thumb can often become a trouble point.
The thumb should be lightly bent, with its placement depending on finger length.
Avoid gripping the bow tightly, as this increases thumb tension.
The bow should not be held tightly; instead, rely on the weight of your arm to play.
1-4. Engage Your Shoulder Blades
Once you’ve mastered the previous steps, try incorporating your shoulder blades.
This expands your range of motion, increasing volume and resonance.
2. Vibrating the Strings
Strings must vibrate freely to produce rich, resonant sound.
Obstacles to vibration can cause:
・Limited volume
・Harsh tone
・Scratched, unclear sound
・Excess noise
2-1. Pay Attention to the Bowing Position
The bow can be used near the bridge or closer to the fingerboard, depending on the desired effect.
These choices help adjust volume and change the tone quality.
・Near the bridge: Produces a louder, richer, and more concentrated sound.
Note: Requires a relatively smaller amount of bow.
・Closer to the fingerboard: Results in a softer, airy, and gentler tone.
Note: Requires a relatively larger amount of bow.
However, if you bow near the bridge or fingerboard without clear intention, both volume and tone quality may become inconsistent.
Note: Since the technique differs between bowing near the bridge and near the fingerboard, moving without intention can disrupt the string’s vibration.
This can also cause:
・Scratched or distorted tones
・Irregular or unclear sound
Therefore, to gain better control and consistency, focus on bowing steadily in the area between the fingerboard and the bridge. Especially during bowing practice, pay close attention to this aspect.
2-2. Bow Straight
This is another crucial point. If possible, practice while looking in a mirror.
Why? Because it can be difficult to tell if your bowing is straight just by watching directly.
One of the common pitfalls in string playing is believing you are bowing straight, only to realize in the mirror that it’s crooked. To avoid this, use a mirror or ask a teacher or someone knowledgeable to check your bowing.
Why is straight bowing important?
Crooked bowing is another common cause of sound issues, such as:
・Scratched or unclear tones
・The sound flipping or breaking
Note: A slanted bow disrupts the vibration of the strings, leading to these problems.
Therefore, during practice, focus on ensuring your bowing is straight.
2-3. Keep the Bow Perpendicular to the Strings
While players sometimes tilt the bow intentionally to soften the sound, this can become a bad habit.
If tilting becomes your default, producing louder or fuller sounds when needed may become more difficult.
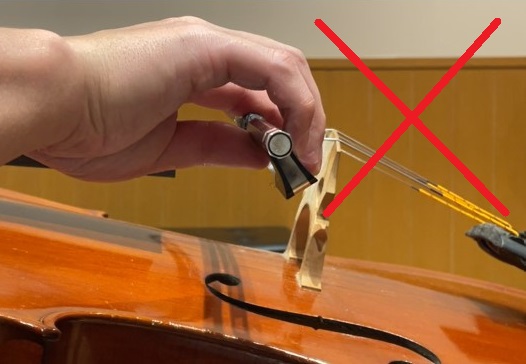

The larger the bow’s contact area with the strings, the more the strings vibrate, resulting in louder sound.


Thus, in daily practice and bowing exercises, aim to keep the bow perpendicular to the strings for optimal sound production.
2-4. Be Mindful of Maintaining String Vibrations
Once you’ve mastered 2-1 through 2-3, the next step is to focus on maintaining the string vibrations consistently. Always keep this in mind while playing.
3. Use the Weight of Your Arm to Bow
If you’ve successfully implemented the techniques in sections 1 and 2, you’ll already be bowing with more ease and producing good sound. The final step is to master “relaxation” by using the weight of your arm.
Relaxation will allow you to bow comfortably and sustain playing for longer periods.
This relaxation technique becomes intuitive once you’ve practiced sections 1 and 2. The key is to develop a feeling of “hanging” or “dangling” your arm.
If you’d like to learn more details or practice in a hands-on format, please refer to the dedicated materials for further guidance.


